For the last few months I have been trying to get A100 80GB PCIe to work on my desktop computer.
The first stage was to get the card recognized by BIOS and then the OS which took quite some figuring out.
The second stage was to get a custom water cooling solution, since A100 runs really hot and it’s very difficult to cool with just fans and typically requires a server-level cooling hardware and a server room with air conditioning.
But after a few months of trials and tribulations I have a working solution, which I’ll share with you in this post.
Getting A100 recognized by BIOS
A100 PCIe is a headless card designed for server use – it has no sockets to plug a monitor in.
I first made a post at NVIDIA forums asking for help and another user found that the only way to make A100 work is to have another NVIDIA GPU to run the monitor from and that it’s currently impossible to use iGPU (built-in gpu available with most Intel CPUs consumer level motherboards).
To benefit from PCIe-4 I purchased ROG Maximus XIII Hero (z590) as my original MB was z390 / PCIe-3.
I first tried using iGPU (CPU Graphics) and A100 lead to the system not POSTING (d4 – PCI resource allocation error. Out of Resources).
As kindly shared by one of the forum users that the current solution is to use a 2nd card, I added a old NVIDIA PCIe card and plugged the monitor into it. Now it POSTed and booted just fine, but still not seeing A100 wasn’t visible in nvidia-smi.
I also tried changing the order of the cards (A100 2nd) – but there was no change in the outcome.
I then experimented with various BIOS configurations until I found one that worked. Here it is:
Advanced:

  Advanced System Agent (SA) configuration

    Graphics Configuration:
      Primary Display: Auto (probably could be set to PEG)
      IGPU Multi-Monitor: Disabled

    Memory Configuration:
      Memory Remap: Enabled (above 4GB)

    PCI Subsystem Settings
      Above 4G Decoding: Enabled
      Resize Bar: Enabled
      SR-IOV Support: Enabled
and the reason it wasn’t working originally is because by default it had SR-IOV Support: Disabled
As it’s possible that other motherboards may or may not work please read this thread where Scott Ellis explains which BIOS settings the server motherboards normally need to detect A100, and which may or may not be present in the consumer motherboard. Another user shared that they got it to work on ASUS ROG STRIX Z690-G GAMING WIFI, so chances are that the recent motherboards support it. If you find others that work please don’t hesitate to share the name in the comments.
Water Cooling A100
Fans proved to be very inadequate for A100 cooling, the huge radiator it came with did well for the first few minutes and then it’d remain really hot – definitely not something usable for the weak PC fans. Perhaps it’d work if I were to blast them at 100% speed but it’d be very loud and won’t work in summer.
I started researching water cooling.
I first ordered the water block from EKWB – they unfortunately didn’t label their product correctly – only in a small print it said that it was for A100 40GB which doesn’t fit A100 80GB PCB. So I wasted a lot of time and lost money on dealing with the wrong product. I asked them to fix the label to state that it’s a 40GB block, but they refuse to do it. And as of this writing they have no plans to make a 80GB version.
Here is the 40GB water block from EKWB:

But A100 80Gb added a metal frame around the main chip as can be seen below. It wasn’t there in the 40GB version of PCB.

Then I ordered Bykski’s A100 80GB water block via aliexpress. The ordering experience wasn’t great as I paid top dollar for quick shipping (DHL) and the vendor abused that, by submitting a shipment label but didn’t ship the product for weeks! As soon as I was able to start a dispute and request a full refused I did that, and immediately the product was shipped. So be careful spending extra money on shipment since Aliexpress allows its vendors to do what they please and they don’t enforce anything.
Here is the water block (left) and the PCB (right):

Taking apart A100 was mainly a matter of removing all the screws. The key to be able to remove the panel is to remove 2 screws around the power plug.
The first step is to clean the main chip from the thermal paste using alcohol and a coffee filter so that the old residue is removed.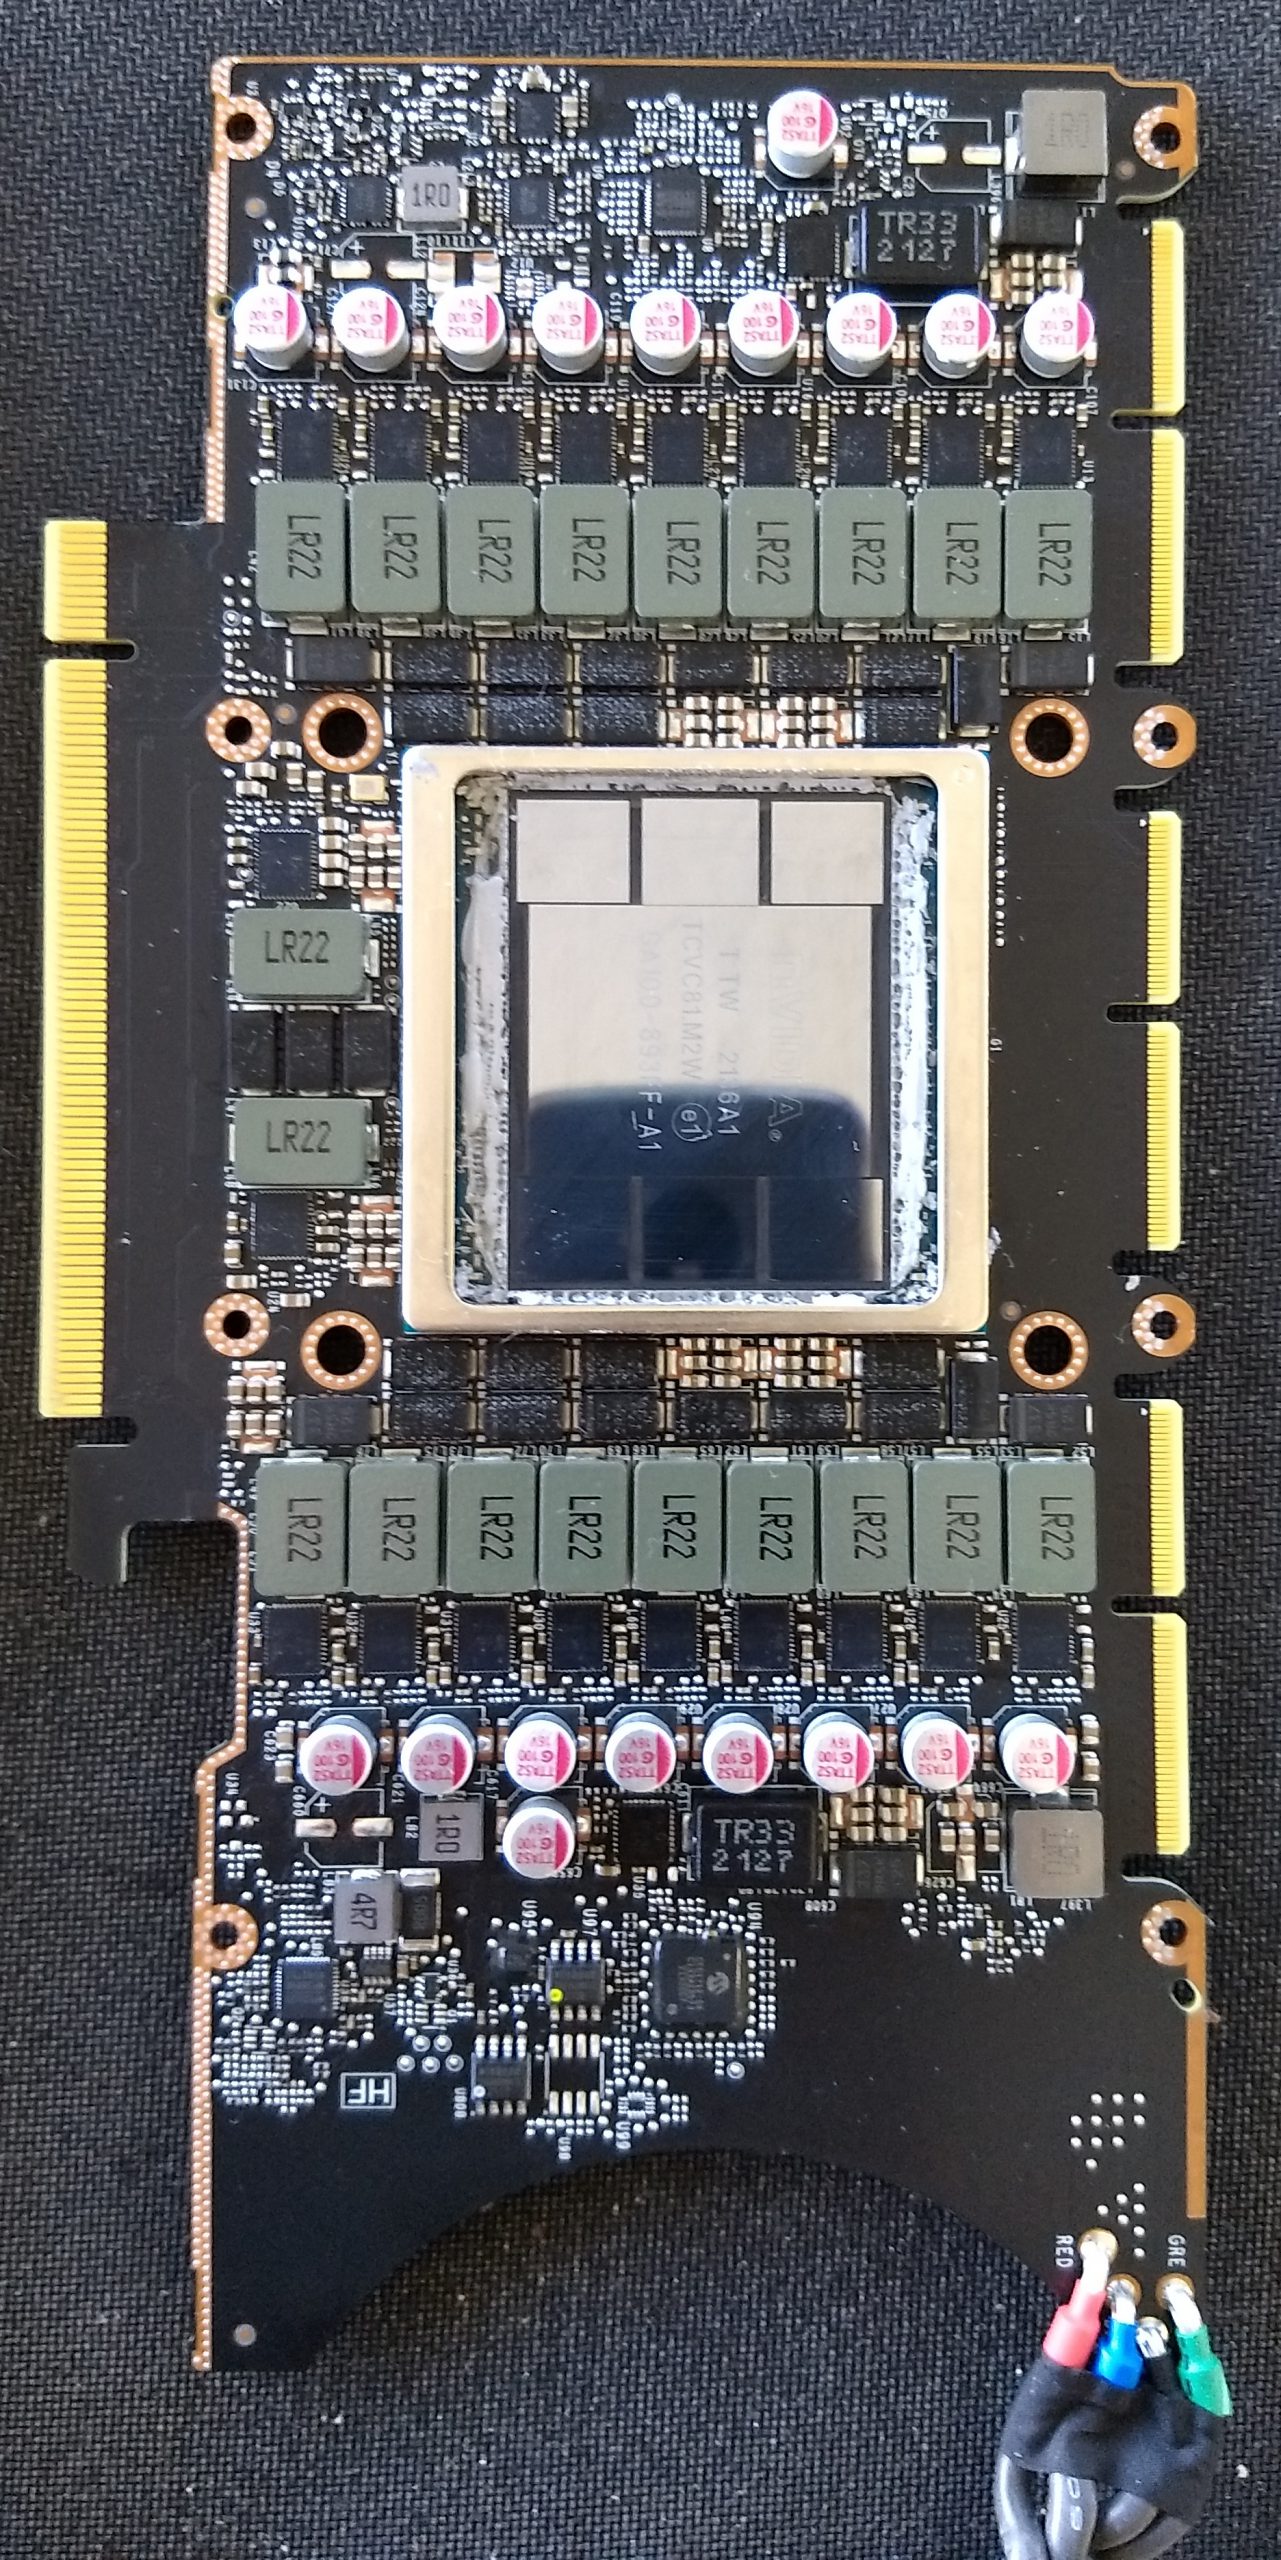
Then thermal pads need to be applied. The instructions provided by Bykski product page are negligently incomplete. Luckily I still had the original radiator to be the model to where I need to apply the thermal pads:

You can see I matched them (actually I now see I missed one of them on the left! ouch)

Now it’s time to put the water block on and tighten the 4 screws around the main chip:

Bykski slacked again and didn’t provide a proper mounting bracket that would fit their product. Their instructions allude to using the bracket from the original A100 radiator. As you can see it had 4 screws mounting the main radiator body and 2 more on the side you can’t see on the picture:
so when you try to mount it on Bykski block you end up with it mostly hanging in the air and attached to the backplate with 2 super tiny screws. This is very poor engineering.

The acrylic block is super-heavy, I’m very concerned that this can break the PCIe socket or the A100 PCB.
(If Bykski engineers read this, please provide your own custom mounting bracket that gets screwed onto the acrylic block and perhaps the backplate. Otherwise your product can easily break the motherboard socket, since the original mounting bracket that comes with A100 was not designed for your watering block.)
Finally I put it all together with a radiator and a reservoir-pump combo from EKWB and had it run for 24h to test for leaks.

This was my first time doing a custom water cooling solution so it wasn’t easy. As I couldn’t afford to have my desktop not working for 24h, I did the whole water cooling ensemble outside and simply plugged it into an old computer while testing for leaks. And the next day I mounted the ensemble in the target PC while keeping the 3 parts interconnected, which was a bit of a challenge but I made it work.
I purchased the huge 7000D AIRFLOW Full-Tower ATX PC Case from Corsair and even then I had a hard time putting this huge EK-CoolStream CE 420 radiator together with the smaller AIO radiator I was using for CPU already. I have multiple HDs and the Corsair HX1200 power-supply that is extra long, so I barely had any space to place all those parts around.
Finally, I had to turn my headless solution for igpu and nvidia cards off, so that it could switch to the NVIDIA driver, while having the monitor plugged into an old GTX-1080 which was perfect as it is low power and doesn’t overheat as easily as the Ampere GPUs. And booted my Kubuntu.
And voila putting some serious load on the card it keeps a nice ~30C – Amazing!

So despite not thinking it fully through the Bykski’s water block works well at the moment.
And yes, A100 80Gb is 10x larger than GTX-1080.
Things to figure out
- setting up software to trigger PWM and water pump adjustments based on temperature reported by
nvidia-smi– at the moment I have just set a normal pump speed in BIOS and using the CPU’s AIO to drive the speed of the fans – typically when GPU is churning CPU is almost always busy as well. - Of course, figuring out how to get rid of the 2nd NVIDIA card and use iGPU instead. Save electric bills and generate less heat. If you discover a solution please share in the comments. Thank you!
Notes
This post is focused on the specifics of getting A100 80GB PCIe working in a PC, and I’m not an expert in water cooling, so besides sharing how I installed the water block itself, I trust you can find the details on the best way to do the water cooling elsewhere.
Huge thanks to the person on the NVIDIA forums who discovered the workaround by using a 2nd card to recognize A100.
Other related gpu-center-at-home tinkering projects
– A 4x A100-SXM setup at home by Leo Paille
Tags: a100, gpu, nvidia, water cooling


Hi, I’ve just set up a build following what you’ve listed, with a 1050Ti as the second GPU.
Could you share how you installed the drivers to get the A100 working?
I’ve installed 510 Server Driver through the `Software & Updates` app, but it only sees the GTX 1050 Ti, not the A100.
My output of `lshw -C display` shows `display UNCLAIMED` for the A100, I’ve tried disabling Secure Boot already, but no dice.
I’ve also downloaded the A100 driver directly from nvidia and run that, but it seems to try and install that for the 1050ti (and fails, correctly)… any thoughts?
Tangentially, also tried this with a really old GT-218 as second GPU, which booted AND saw the A100, but as soon as I installed newer drivers for that one Ubuntu would just black-screen.
This request got resolved here so all works now.
Hi,
Thanks for this write-up! I have some questions:
1) Was the original copper heat sink hard to remove?
2) Does the 80GB version have the x-shaped bracket on the back? The 40GB has this.
It was very easy for most of it – just unscrewing the bolts on both sides. Just the connector part was slightly tricky.
I don’t know what 40GB’s one looks like, but you can see the 80GB’s bracket on several photos in the post. As I said the water cooling block vendor failed to provide a proper bracket so I had to re-use the original one (which isn’t quite suitable, but it was as good as it gets).
Hi,
Thanks for this. I managed to get an A100 running on Asus Pro WS W680-ACE motherboard using your instructions and matching up the BIOS settings, however as with you I have had to use a second GPU in order to successfully POST.
Did you have any luck resolving that? I’ve tried tweaking a few things in the BIOS (and have updated to latest BIOS) but no luck with only the iGPU running.
Awesome news, Dan. Glad to hear it worked for you too!
Which cooling solution are you using if you don’t mind me asking?
I haven’t researched iGPU beyond the initial attempts, I spent too much time trying to get the initial solution working so had to get back to do real work. If you figure it out please do share the solution.
At present I’ve rigged a 120mm fan with some plastic and tape and running it full blast which is sufficient to keep the temps to 34C at idle and have yet to get it above 50C under load, but have only done moderate testing so far.
The back pressure is very high so its not very efficient but good enough for now.
For the longer term I am working on getting a 3d printed attachment (similar to this https://www.chillgpu.com/products/nvidia-a100-cmp-170hx-40mm-fan-kit-for-2-fans unfortunately they do not ship to my country).
On the adaptor I will install 2x of these: https://noctua.at/en/nf-a4x20-pwm
It seems like some people had luck installing a small IPMI card onto their motherboard and using the display port included with that to get around needing a full size GPU which on this motherboard also reduces the slot from x16 to x8 unfortunately. So I may try that route at some point – but like you am short on time!
Thank you for sharing your setup, Dan.
When I tried to put my card under load with air cooling it’d spike up in heat.
Installing watercooling was an ordeal but it has been steady and very cool so it was well worth the time investment.
I was able to get the A100 80GB SXM running on a low end consumer system with help from this guide, thank you. Details below:
MSI B760 GAMING PLUS WIFI DDR4
8GB DDR4 RAM
Intel i3-12100
SXM4 to PCIe adapter board from China.
RTX3060ti
BIOS options:
SR-IOV Support: Enabled (Not sure if necessary)
IGD Multi-monitor: Disabled
Needed the RTX3060ti to post. Any discreet gpu would probably work. No workaround found. The A100 has 16PCIe lanes as the 3060ti is in a 1x limited bottom slot.
Thank you for sharing your success story! Even better with SXM!
Thank you for sharing that you too couldn’t find how to make it boot on its own or with igpu and still requiring an additional PCIe gpu.